Centos7+OPENLDAP+SAMBA配置
本文旨在测试客户端访问samba服务器时,通过ldap进行用户的认证。用户访问samba权限则通过samba本身控制。
环境
Ldap服务器:centos7 系统 IP : 192.168.0.8 主机名:ldapnode
Samba服务器:centos7 系统 IP: 192.168.0.63 主机名:node3
服务器均关闭防火墙以及selinux
安装LDAP
配置epel源
[root@ldapnode ~]# cat /etc/yum.repos.d/epel.repo
[epel]
name=aliyun epel
baseurl=http://mirrors.aliyun.com/epel/7Server/x86_64/
gpgcheck=0
[root@ldapnode ~]#
安装ldap samba
[root@ldapnode ~]# yum install -y openldap-servers openldap-clients migrationtools samba-common samba samba-client
确保安装无误。
[root@ldapnode ~]# rpm -qa|grep ldap
compat-openldap-2.3.43-5.el7.x86_64
openldap-clients-2.4.40-13.el7.x86_64
openldap-2.4.40-13.el7.x86_64
openldap-servers-2.4.40-13.el7.x86_64
[root@ldapnode ~]# rpm -qa|grep samba
samba-common-libs-4.4.4-12.el7_3.x86_64
samba-common-tools-4.4.4-12.el7_3.x86_64
samba-client-4.4.4-12.el7_3.x86_64
samba-common-4.4.4-12.el7_3.noarch
samba-client-libs-4.4.4-12.el7_3.x86_64
samba-libs-4.4.4-12.el7_3.x86_64
samba-4.4.4-12.el7_3.x86_64
[root@ldapnode ~]#
配置时间同步
[root@ldapnode ~]# ntpdate pool.ntp.org
20 Jan 11:44:37 ntpdate[16342]: step time server 173.255.215.209 offset -28801.403434 sec
配置LDAP
生成LDAP管理员密码
[root@ldapnode ~]# slappasswd
New password:
Re-enter new password:
{SSHA}OONP2dL3kkukflJIDp4gepGR2EdfD0fN
[root@ldapnode ~]#
此处我自己设置的为123456,自定义。
拷贝数据库文件
[root@ldapnode ~]# ls /var/lib/ldap/
[root@ldapnode ~]# cp /usr/share/openldap-servers/DB_CONFIG.example /var/lib/ldap/DB_CONFIG
[root@ldapnode ~]# chown ldap:ldap /var/lib/ldap/DB_CONFIG
[root@ldapnode ~]# ls /var/lib/ldap/
DB_CONFIG
[root@ldapnode ~]#
修改ldap配置
因centos7操作系统较centos6在ldap的配置上变化很大,而我不熟悉centos7的配置。故先拷贝centos6的配置文件,进行相关samba方面的配置修改。然后通过slaptest命令进行格式转换。
下面为配置文件存放在/root下
[root@node2 ~]# cat slapd.conf
#
# See slapd.conf(5) for details on configuration options.
# This file should NOT be world readable.
#
include /etc/openldap/schema/corba.schema
include /etc/openldap/schema/core.schema
include /etc/openldap/schema/cosine.schema
include /etc/openldap/schema/duaconf.schema
include /etc/openldap/schema/dyngroup.schema
include /etc/openldap/schema/inetorgperson.schema
include /etc/openldap/schema/java.schema
include /etc/openldap/schema/misc.schema
include /etc/openldap/schema/nis.schema
include /etc/openldap/schema/openldap.schema
include /etc/openldap/schema/ppolicy.schema
include /etc/openldap/schema/collective.schema
include /etc/openldap/schema/samba.schema
# Allow LDAPv2 client connections. This is NOT the default.
allow bind_v2
# Do not enable referrals until AFTER you have a working directory
# service AND an understanding of referrals.
#referral ldap://root.openldap.org
pidfile /var/run/openldap/slapd.pid
argsfile /var/run/openldap/slapd.args
# Load dynamic backend modules
# – modulepath is architecture dependent value (32/64-bit system)
# – back_sql.la overlay requires openldap-server-sql package
# – dyngroup.la and dynlist.la cannot be used at the same time
# modulepath /usr/lib/openldap
# modulepath /usr/lib64/openldap
# moduleload accesslog.la
# moduleload auditlog.la
# moduleload back_sql.la
# moduleload chain.la
# moduleload collect.la
# moduleload constraint.la
# moduleload dds.la
# moduleload deref.la
# moduleload dyngroup.la
# moduleload dynlist.la
# moduleload memberof.la
# moduleload pbind.la
# moduleload pcache.la
# moduleload ppolicy.la
# moduleload refint.la
# moduleload retcode.la
# moduleload rwm.la
# moduleload seqmod.la
# moduleload smbk5pwd.la
# moduleload sssvlv.la
# moduleload syncprov.la
# moduleload translucent.la
# moduleload unique.la
# moduleload valsort.la
# The next three lines allow use of TLS for encrypting connections using a
# dummy test certificate which you can generate by running
# /usr/libexec/openldap/generate-server-cert.sh. Your client software may balk
# at self-signed certificates, however.
TLSCACertificatePath /etc/openldap/certs
TLSCertificateFile “\”OpenLDAP Server\””
TLSCertificateKeyFile /etc/openldap/certs/password
# Sample security restrictions
# Require integrity protection (prevent hijacking)
# Require 112-bit (3DES or better) encryption for updates
# Require 63-bit encryption for simple bind
# security ssf=1 update_ssf=112 simple_bind=64
# Sample access control policy:
# Root DSE: allow anyone to read it
# Subschema (sub)entry DSE: allow anyone to read it
# Other DSEs:
# Allow self write access
# Allow authenticated users read access
# Allow anonymous users to authenticate
# Directives needed to implement policy:
# access to dn.base=”” by * read
# access to dn.base=”cn=Subschema” by * read
# access to *
# by self write
# by users read
# by anonymous auth
#
# if no access controls are present, the default policy
# allows anyone and everyone to read anything but restricts
# updates to rootdn. (e.g., “access to * by * read”)
#
# rootdn can always read and write EVERYTHING!
# enable on-the-fly configuration (cn=config)
#database config
#access to *
# by dn.exact=”gidNumber=0+uidNumber=0,cn=peercred,cn=external,cn=auth” manage
# by * none
# enable server status monitoring (cn=monitor)
database monitor
access to *
by dn.exact=”cn=Manager,dc=example,dc=com” read
by * none
access to attrs=userPassword
by self write
by anonymous auth
by * none
access to attrs=sambaNTPassword
by self write
by anonymous auth
by * none
access to *
by self write
by * read
#######################################################################
# database definitions
#######################################################################
database bdb
suffix “dc=example,dc=com”
checkpoint 1024 15
rootdn “cn=Manager,dc=example,dc=com”
# Cleartext passwords, especially for the rootdn, should
# be avoided. See slappasswd(8) and slapd.conf(5) for details.
# Use of strong authentication encouraged.
# rootpw secret
rootpw {SSHA}OONP2dL3kkukflJIDp4gepGR2EdfD0fN
# The database directory MUST exist prior to running slapd AND
# should only be accessible by the slapd and slap tools.
# Mode 700 recommended.
directory /var/lib/ldap
# Indices to maintain for this database
index objectClass eq,pres
index ou,cn,mail,surname,givenname eq,pres,sub,approx
index uidNumber,gidNumber,loginShell eq,pres
index uid,memberUid eq,pres,sub
index nisMapName,nisMapEntry eq,pres,sub
# Replicas of this database
#replogfile /var/lib/ldap/openldap-master-replog
#replica host=ldap-1.example.com:389 starttls=critical
# bindmethod=sasl saslmech=GSSAPI
# authcId=host/ldap-master.example.com@EXAMPLE.COM
红色地方为在原有基础上进行的修改调整,其中rootpw为之前生成的ldap管理员密码。Ldap管理员目录为cn=Manager,dc=example,dc=com
删除原有ldap默认配置
[root@ldapnode ~]# rm -rf /etc/openldap/slapd.d/*
生成新配置
[root@ldapnode ~]# cd /etc/openldap/slapd.d/
[root@ldapnode slapd.d]# ll
total 0
[root@ldapnode slapd.d]# slaptest -f /root/slapd.conf -F /etc/openldap/slapd.d/
58818b6f bdb_db_open: database “dc=example,dc=com”: db_open(/var/lib/ldap/id2entry.bdb) failed: No such file or directory (2).
58818b6f backend_startup_one (type=bdb, suffix=”dc=example,dc=com”): bi_db_open failed! (2)
slap_startup failed (test would succeed using the -u switch)
[root@ldapnode slapd.d]# ll
total 8
drwxr-x— 3 root root 4096 Jan 20 12:00 cn=config
-rw——- 1 root root 1251 Jan 20 12:00 cn=config.ldif
修改属组
[root@ldapnode slapd.d]# chown -R ldap:ldap /etc/openldap/slapd.d/
创建ldap数据库文件
[root@ldapnode ~]# cat base.ldif
dn: dc=example,dc=com
objectClass: organization
objectClass: dcObject
dc: example
o: example
dn: cn=Manager,dc=example,dc=com
objectClass: organizationalRole
cn: Manager
description: Directory Manager
dn: ou=People,dc=example,dc=com
objectClass: organizationalUnit
ou: People
dn: ou=group,dc=example,dc=com
objectClass: organizationalUnit
ou: group
创建用户和组并生成相关配置文件
创建4个用户分别为user1-4 创建2个组分别为test1,test2。将user1,user2加入到组test1,将user3,user4加入到组test2.
[root@ldapnode ~]# groupadd test1
[root@ldapnode ~]# groupadd test2
[root@ldapnode ~]# useradd user1 -g test1
[root@ldapnode ~]# useradd user2 -g test1
[root@ldapnode ~]# useradd user3 -g test2
[root@ldapnode ~]# useradd user4 -g test2
[root@ldapnode ~]# id user1
uid=1000(user1) gid=1000(test1) groups=1000(test1)
[root@ldapnode ~]# id user2
uid=1001(user2) gid=1000(test1) groups=1000(test1)
[root@ldapnode ~]# id user3
uid=1002(user3) gid=1001(test2) groups=1001(test2)
[root@ldapnode ~]# id user4
uid=1003(user4) gid=1001(test2) groups=1001(test2)
[root@ldapnode ~]#
生成用户跟组初始化文件
[root@ldapnode ~]# grep “:10[0-9][0-9]” /etc/passwd > /root/passwd
[root@ldapnode ~]# grep “:10[0-9][0-9]” /etc/group > /root/group
[root@ldapnode ~]# cat passwd
user1:x:1000:1000::/home/user1:/bin/bash
user2:x:1001:1000::/home/user2:/bin/bash
user3:x:1002:1001::/home/user3:/bin/bash
user4:x:1003:1001::/home/user4:/bin/bash
[root@ldapnode ~]# cat group
test1:x:1000:
test2:x:1001:
编辑migrationtools配置文件
[root@ldapnode ~]# vi /usr/share/migrationtools/migrate_common.ph
第71行修改domain信息
70 # Default DNS domain
71 $DEFAULT_MAIL_DOMAIN = “example.com”;
72
73 # Default base
74 $DEFAULT_BASE = “dc=example,dc=com”;
将用户跟组文件导入到ldif文件中
[root@ldapnode ~]# /usr/share/migrationtools/migrate_passwd.pl passwd user.ldif
[root@ldapnode ~]# /usr/share/migrationtools/migrate_group.pl group group.ldif
将基础数据导入到LDAP中
将以上生成的base.ldif user.ldif group.ldif导入到LDAP中
修改权限并启动ldap
[root@ldapnode ldap]# chown -R ldap:ldap /var/lib/ldap/
[root@ldapnode ldap]# systemctl start slapd
确定启动OK
[root@ldapnode ~]# ldapadd -x -W -D “cn=Manager,dc=example,dc=com” -f base.ldif
Enter LDAP Password:
adding new entry “dc=example,dc=com”
adding new entry “cn=Manager,dc=example,dc=com”
adding new entry “ou=People,dc=example,dc=com”
adding new entry “ou=group,dc=example,dc=com”
[root@ldapnode ~]# ldapadd -x -W -D “cn=Manager,dc=example,dc=com” -f user.ldif
Enter LDAP Password:
adding new entry “uid=user1,ou=People,dc=example,dc=com”
adding new entry “uid=user2,ou=People,dc=example,dc=com”
adding new entry “uid=user3,ou=People,dc=example,dc=com”
adding new entry “uid=user4,ou=People,dc=example,dc=com”
[root@ldapnode ~]# ldapadd -x -W -D “cn=Manager,dc=example,dc=com” -f group.ldif
Enter LDAP Password:
adding new entry “cn=test1,ou=Group,dc=example,dc=com”
adding new entry “cn=test2,ou=Group,dc=example,dc=com”
[root@ldapnode ~]#
确认
[root@ldapnode ~]# ldapsearch -x -b “dc=example,dc=com” “(objectclass=*)”
省略返回
安装phpadmin
[root@ldapnode ~]# yum install -y httpd php php-mbstring php-pear
[root@ldapnode ~]# yum –enablerepo=epel -y install phpldapadmin
[root@ldapnode ~]# vi /etc/httpd/conf/httpd.conf
151 AllowOverride all
156 Require all granted
157 </Directory>
163 <IfModule dir_module>
164 DirectoryIndex index.html index.cgi index.php
165 </IfModule>
[root@ldapnode ~]# vi /etc/phpldapadmin/config.php
397 $servers->setValue(‘login’,’attr’,’dn’);
398 //$servers->setValue(‘login’,’attr’,’uid’);
[root@ldapnode ~]# vi /etc/httpd/conf.d/phpldapadmin.conf
Alias /phpldapadmin /usr/share/phpldapadmin/htdocs
Alias /ldapadmin /usr/share/phpldapadmin/htdocs
<Directory /usr/share/phpldapadmin/htdocs>
<IfModule mod_authz_core.c>
# Apache 2.4
Require local
Require ip 192.168.0.0/24
</IfModule>
<IfModule !mod_authz_core.c>
# Apache 2.2
Order Deny,Allow
Deny from all
Allow from 127.0.0.1
Allow from ::1
</IfModule>
</Directory>
启动httpd
[root@ldapnode ~]# systemctl start httpd
Web浏览器登入
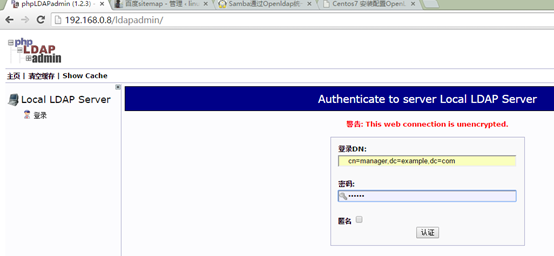
Dn : cn=manager,dc=example,dc=com
密码:123456
创建条目的时候能看到samba:domain 既为已支持samba。
安装配置samba服务器
root@node3 ~]# yum -y install samba-common samba samba-client
配置samba
[root@node3 b]# cat /etc/samba/smb.conf
[global]
workgroup = WORKGROUP
server string = Samba-ldap Server Version %v
netbios name = samba-ldapsam
log file = /var/log/samba/log.%m
max log size = 50
security = user
passdb backend = ldapsam:ldap://192.168.0.8/
ldap suffix = “dc=example,dc=com”
ldap admin dn = “cn=Manager,dc=example,dc=com”
ldap user suffix = “ou=People,dc=example,dc=com”
ldap group suffix = “ou=group,dc=example,dc=com”
ldap delete dn = no
ldap passwd sync = yes
ldap ssl = no
[myshare-a]
comment = share for users
path = /ceshi/a
browseable = yes
public = no
writable = yes
[myshare-b]
comment = share for users
path = /ceshi/b
browseable = yes
public = no
writable = yes
启动samba服务
[root@node3 b]# systemctl start smb
保存ldap密码到samba中
提示:为了使samba能够访问ldap,把ldap管理员的密码保存到samba的secrets.tdb中(/var/lib/samba/private/secrets.tdb)
[root@node3 b]# smbpasswd -w 123456
Setting stored password for “cn=Manager,dc=example,dc=com” in secrets.tdb
[root@node3 b]#
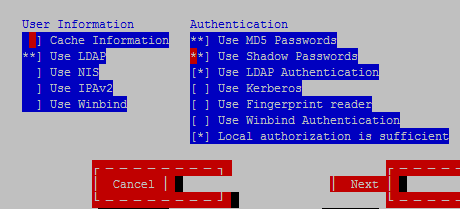
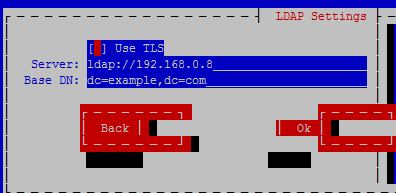
设置samba服务器从ldap认证
[root@node3 ~]# authconfig-tui
验证用户
[root@node3 ~]# id user1
uid=1000(user1) gid=1000(test1) groups=1000(test1)
[root@node3 ~]# id user2
uid=1001(user2) gid=1000(test1) groups=1000(test1)
[root@node3 ~]# id user3
uid=1002(user3) gid=1001(test2) groups=1001(test2)
[root@node3 ~]# id user4
uid=1003(abc) gid=1003(abc) groups=1003(abc)
[root@node3 ~]# cat /etc/passwd |grep user1
[root@node3 ~]#
可以看到本地不存在的用户但是能显示,则通过LDAP认证的用户。
web刷新
点击刷新按钮

能看到samba条目
验证
设置域用户的samba密码
[root@node3 ~]# smbpasswd -a user1
New SMB password:
Retype new SMB password:
Added user user1.
[root@node3 ~]# smbpasswd -a user2
New SMB password:
Retype new SMB password:
Added user user2.
[root@node3 ~]# smbpasswd -a user3
New SMB password:
Retype new SMB password:
Added user user3.
[root@node3 ~]# smbpasswd -a user4
New SMB password:
Retype new SMB password:
Added user user4.
[root@node3 ~]#
均为123456
Linux 客户端测试
[root@node2 ~]# smbclient -U user1 //192.168.0.63/myshare-a
Enter user1’s password:
Domain=[WORKGROUP] OS=[Windows 6.1] Server=[Samba 4.4.4]
smb: \> ls
. D 0 Fri Jan 20 13:17:18 2017
.. D 0 Thu Jan 19 14:47:33 2017
18655232 blocks of size 1024. 17162180 blocks available
smb: \>
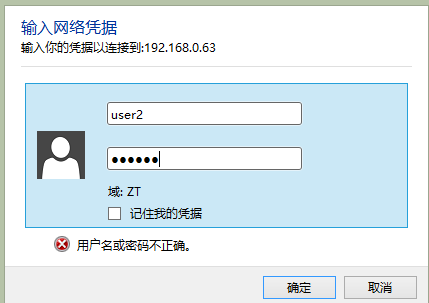
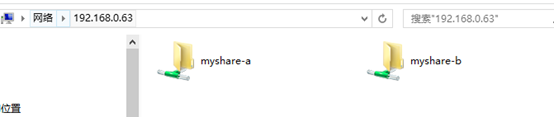
windows客户端测试